

What I used: 1 Tide Pod container, 1 Martha Stewart Circle Punch Cutter, Assorted Craft Paper, 1 medium size Cardboard, Hot glue Gun sticks (lots of them) , 1 Empty Plastic Water bottle cut in half, felt, 2 glass beads 1 lamp kit from the hardware store 1 Lamp Shade.
How I did it: I cut a couple hundred circles with the circle cutter and glue them to the tide container to create the scales and body of the fish. For the Tail Fins I drew 2 semi hearts out of cardboard and then glue more paper circles to it until they were covered. I glued them to a side of the container. To make the fish mouth I used the top part of the water bottle and attached it to the other side of the container opposite to the tail fins. left the lid on because I thought it looked cute. My hubs drilled a hole on the top of the tide container (lid) and adapted the lamp kit to it after that he opened another on the bottom to let the cable out. Cut 2 pieces of felt of a contrasting color and make 2 circles to represent the eyes 1 for each side of the container. Use to glass beads to create the "watery effect' of the eye. Your lamp should be working now!

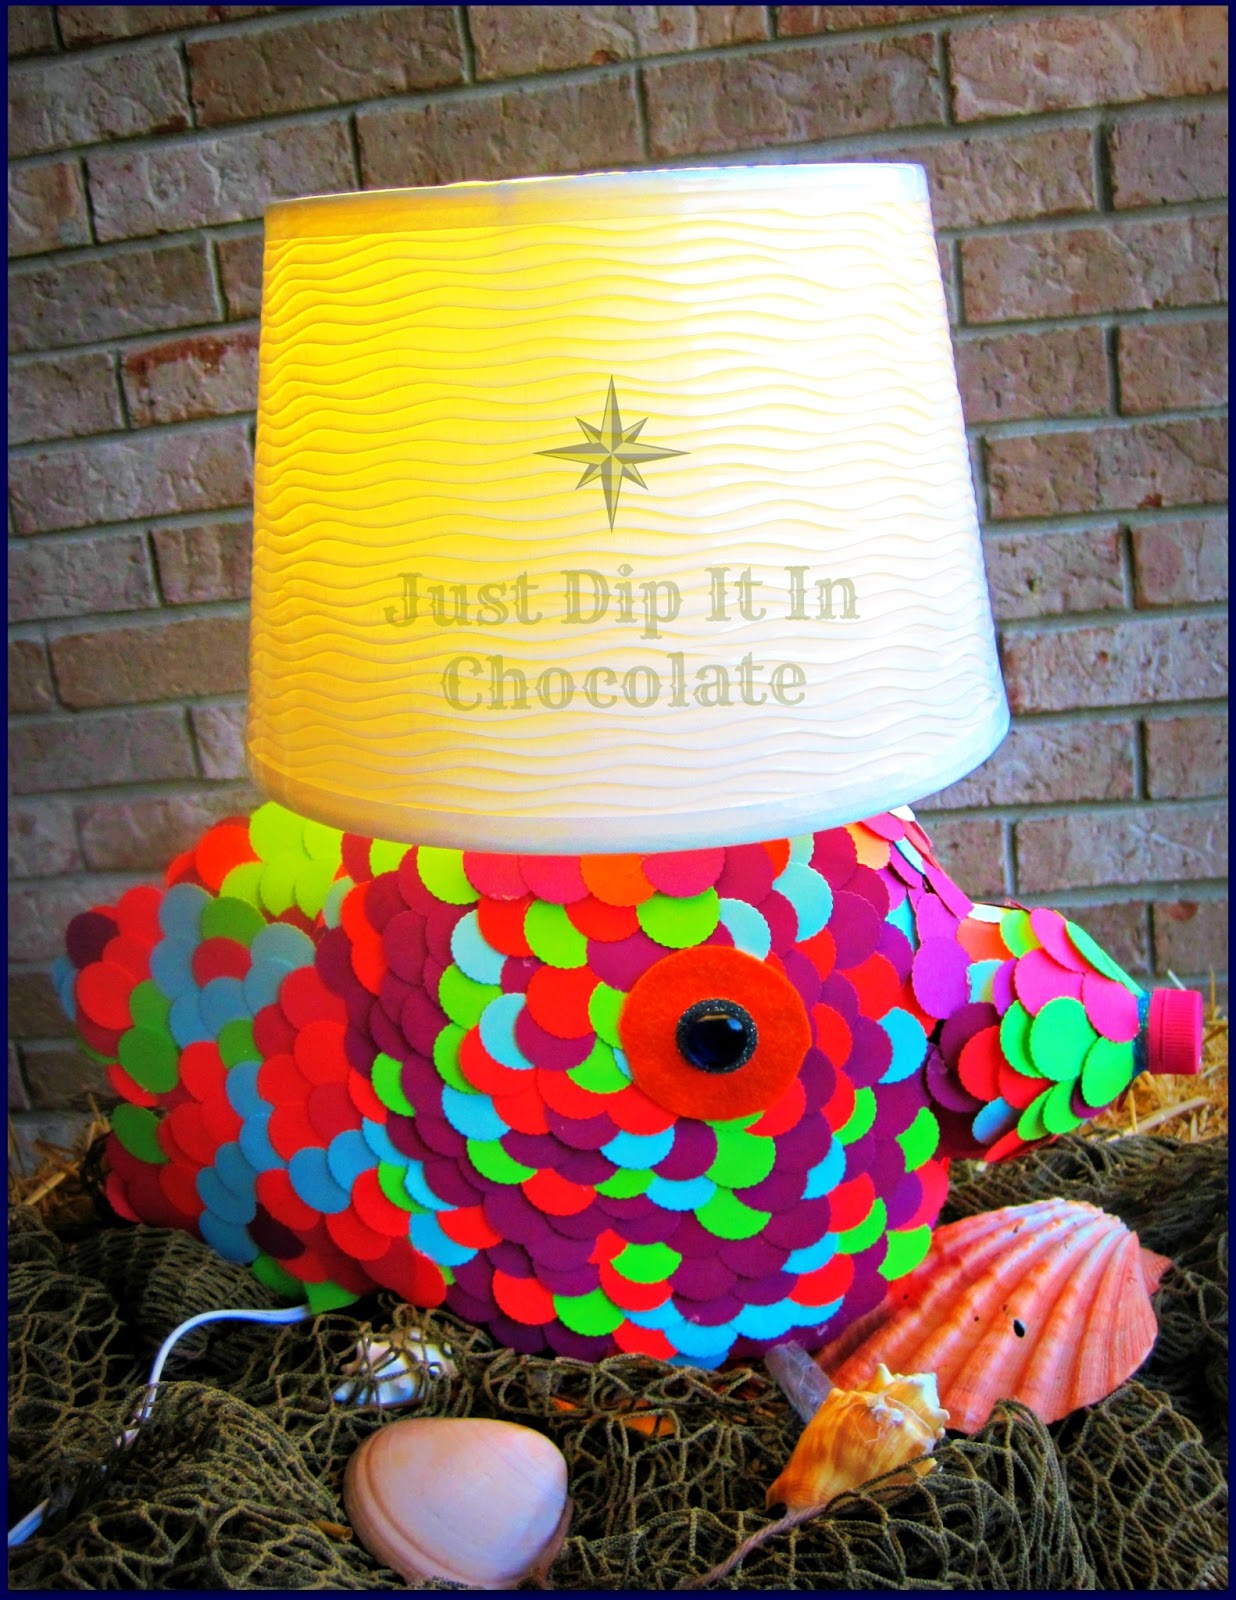
I am happy with the results ..and before I forget the lamp shade was on sale at Target for 60% off , I love it has a wavy pattern, just like the ocean. Basically the total cost of this lamp was about $12 dollars! not bad huh?

I think my rainbow fish have some personality don't you think? I mean...for a fish that is!

As nighttime begins to fall, we need to move "Rainbow" to it's permanent location

My Little Boy's Room, which by the way is all Ocean and Beach Motif

He is happy and mama is happy to ( I finally got something good out of that container now I finally can move on to those milk jugs waiting to be transformed, lol)
Thank you for your kind visit. Look around for things you do everyday for inspiration in creating beauty and whimsy around you, we all need to smile more often and worry less!

Good Night Rainbow Fish!
Besitos,
Lizy
Sharing Good Night "Fishy" Wishes at these Fabulous Parties:


Good Night Rainbow Fish!
Besitos,
Lizy
Sharing Good Night "Fishy" Wishes at these Fabulous Parties:
The Best Blog Recipes, Craftionary, Naptime Crafters, Kitchen Fun with my 3 Sons, The Answer is Chocolate, Living Better Together, The Jenny Evolution, Becoming Martha, Happy Hour Projects,
Tooted in Thyme, One Tough Mother, Tidy Mom, 504 Main, The Pin Junkie, My Turn (for Us), Love and Laundry, Happy and Blessed Home, The Wondering Brain, Lovely Crafty Blog, A Little Claireification, Homemade Ginger, 4 Little Fergusons, 30 Handmade Days, Five Days 5 Ways, Sew;Licious Home Decor, Angels Homestead, Be Different Act Normal, Too Much Time on my Hands, Cheerios and Lattes, It's Overflowing, Serenity You, Mama Gab, Life on Lakeshore Drive, Bowdabra, Cooking for the Seven Dwarfs, Titi Crafty, WCFS, Crate with Joy, Frugal Foodie Mama, Claire Justine oxox, Uncommon Designs, Alderberry Hill, BoogieBoard Cottage, Flour Me with Love, Keeping it Simple, Sew Can Do, Cupcake-n-Bake, Jembellish, Jam Hands, Sumo's Sweet Stuff, The Chicken Chick, Craft-o-Maniac, Huckleberry Love, Under the Table and Dreaming, The Plaid and Paisley Kitchen, The Princess and her Cowboys, I Gotta Try That, Between Naps on the Porch, Who Needs a Cape, Love Grows Wild, Todays Creative Blog, Nap-Time Creations, Home Stories A to Z, Adventures of a DIY Mom, Sugar Bee Crafts, Our Home Away from Home, The Blackberry Vine, Feeding Big, Chef in Training, Love Bakes Good Cakes, Homemade Ginger, Smart School House, Made to be a Momma, Ducks'n a Row, Daisy Cottage Designs, The Lady Behind the Curtain, My Girlish Whims, Handy Man, Crafty Woman, Fluster Buster, The Shabby Creek Cottage, 52 Mantels,What's Cooking Love?, A Handful of Everything, Chocolate, Chocolate and More, Lamberts Lately, Live,Laugh,Rowe, Designed Decor, The Mandatory Mooch, Real Coake.com, Posed Perfection, The Crafty Blogstalker, Consider Me Inspired, Sparkles and a Stove, MommiFried, Somewhat Simple, French Country Cottage, Artsy Fartsy Mama, Living Well Spending Less, The Brambleberry Cottage, the Shabby Nest, A Simple Five, My Personal Accent, Krafty Card Set, Tatertots and Jello, Lydia's Flexitarian Kitchen, Dear Creatives, Classy Clutter, Debbiedoo's, The Taylor House, Suburbs Mama, The Foley Fam, Twigg Studios, Mama Dish, Powerful Mothering, Dragonfly Designs, House of Hepworths, My Joy Filled Life, Food Done Light, Fun-A-Day, DIY Vintage Chic
Tooted in Thyme, One Tough Mother, Tidy Mom, 504 Main, The Pin Junkie, My Turn (for Us), Love and Laundry, Happy and Blessed Home, The Wondering Brain, Lovely Crafty Blog, A Little Claireification, Homemade Ginger, 4 Little Fergusons, 30 Handmade Days, Five Days 5 Ways, Sew;Licious Home Decor, Angels Homestead, Be Different Act Normal, Too Much Time on my Hands, Cheerios and Lattes, It's Overflowing, Serenity You, Mama Gab, Life on Lakeshore Drive, Bowdabra, Cooking for the Seven Dwarfs, Titi Crafty, WCFS, Crate with Joy, Frugal Foodie Mama, Claire Justine oxox, Uncommon Designs, Alderberry Hill, BoogieBoard Cottage, Flour Me with Love, Keeping it Simple, Sew Can Do, Cupcake-n-Bake, Jembellish, Jam Hands, Sumo's Sweet Stuff, The Chicken Chick, Craft-o-Maniac, Huckleberry Love, Under the Table and Dreaming, The Plaid and Paisley Kitchen, The Princess and her Cowboys, I Gotta Try That, Between Naps on the Porch, Who Needs a Cape, Love Grows Wild, Todays Creative Blog, Nap-Time Creations, Home Stories A to Z, Adventures of a DIY Mom, Sugar Bee Crafts, Our Home Away from Home, The Blackberry Vine, Feeding Big, Chef in Training, Love Bakes Good Cakes, Homemade Ginger, Smart School House, Made to be a Momma, Ducks'n a Row, Daisy Cottage Designs, The Lady Behind the Curtain, My Girlish Whims, Handy Man, Crafty Woman, Fluster Buster, The Shabby Creek Cottage, 52 Mantels,What's Cooking Love?, A Handful of Everything, Chocolate, Chocolate and More, Lamberts Lately, Live,Laugh,Rowe, Designed Decor, The Mandatory Mooch, Real Coake.com, Posed Perfection, The Crafty Blogstalker, Consider Me Inspired, Sparkles and a Stove, MommiFried, Somewhat Simple, French Country Cottage, Artsy Fartsy Mama, Living Well Spending Less, The Brambleberry Cottage, the Shabby Nest, A Simple Five, My Personal Accent, Krafty Card Set, Tatertots and Jello, Lydia's Flexitarian Kitchen, Dear Creatives, Classy Clutter, Debbiedoo's, The Taylor House, Suburbs Mama, The Foley Fam, Twigg Studios, Mama Dish, Powerful Mothering, Dragonfly Designs, House of Hepworths, My Joy Filled Life, Food Done Light, Fun-A-Day, DIY Vintage Chic
Other DYI Lamps You Might Like:


.JPG)
.JPG)
.JPG)


.JPG)