Showing posts with label vegan. Show all posts

Sunday, August 25, 2013

Fresh Rosemary Bread


"With a piece of bread in your hand you’ll find paradise under a pine tree."
 
– Russian Proverb


I made this rosemary bread to eat at a BBQ I hosted. Bread may seem strange to serve at a BBQ, homemade bread even stranger perhaps. Here's the way I see it. When guests come over to my house, I want them to eat well. Of course you want them to eat well, you say! What that means to me is to serve food you don't normally get. Special food.  What that means from one person to the next is subjective. For these particular guests, I know they like bread, for example. I also know that one of them loves dessert and goes on and on about fresh whipped cream.


I used fresh rosemary from my very mature rosemary bush. I've added different amounts in the recipe for mature rosemary such as mine, or rosemary from the grocery store since mature homegrown rosemary is stronger in taste than what you would get from the grocery store.


So for dessert I served a homemade pound cake (recipe coming soon) topped with fresh peaches and lots of really spectacular homemade whipped cream. What made it so special is I used the best cream available to me, Twinbrook Creamery cream. Almost raw, and from Jersey cows, so it's even higher in fat content. I mean this stuff is ridiculous.


My bread rising it's first rise


Bread isn't really special in and of itself, but homemade bread is quite special. The smell that wafts through your house while it bakes is hypnotizing. I mean how often do you get homemade bread?


My dough rounds about to rise for the second time

Since I'm in the kitchen most of the day when guests come, making bread is easy. Most of the time spent is in the rising. I used a Kitchen aid mixer to knead my dough, but even if you knead it by hand, that only takes 10 minutes or so. Definitely worth it. Heck, if you have a bread machine, you could make the dough on the dough setting and just bake off the rounds in the oven.


After the second rise, ready for the oven

This bread in particular is crazy cheap too. I mean it's only flour, yeast, a bit of sugar, some rosemary, (My rosemary came from my garden so I didn't have to pay for it) and a little olive oil.


After baking shortly you brush the bread with oil and top with more rosemary and some coarse salt


This bread is well worth the little effort it takes. The recipe is adapted from Food Network's, Almost Famous Rosemary Bread. It has lots of great reviews with good reason. It's soft and tender, and fragrant with fresh rosemary. I love the crunchy bits of salt that top the bread. It can be dipped into olive oil and balsamic vinegar, or simply spread with soft butter.


Right out of the oven!

We ate our bread with a Caprese salad with buratta cheese and heirloom tomatoes. We drank watermelon mojitos made with fresh mint from my garden. Our dinner was kebabs on the BBQ, with 3 different homemade dipping sauces: fresh pineapple teriyaki, chimichurri, and a tzatziki sauce. It was a fun and relaxing warm summer night, filled with laughter, great friends and great food.


Here is the BBQ where I served this bread. The salad is a Caprese salad with heirloom tomatoes, fresh basil and Burrata. It was delicious!


Never miss a post! Follow The Alchemist on Facebook! Or Pinterest!


Fresh Rosemary Bread


This recipe is adapted from Almost Famous Rosemary Bread from Foodnetwork.com

This recipe makes 4 small rounds

The bread is best eaten the same day it's made

Ingredients

1 1/4 oz. packet (or 2 1/2 tsp.) of active dry yeast

2 tsp. sugar

2 Tablespoons olive oil plus more for brushing

2 1/2 cups (312 g.) all purpose flour plus more for dusting

4 Tablespoons fresh rosemary chopped finely (if you have your own rosemary bush and it's pretty mature, use 3 - 3 1/2 Tablespoons) If you are buying it from the store, use the 4 Tablespoons. OR if using dried rosemary, use 1 Tablespoon

1 tsp. fine salt


For Topping Bread

Kosher salt or another type of coarse salt

1/2 Tablespoon fresh, finely chopped Rosemary - or if using dried also use 1/2 Tablespoon

Directions

Stir the yeast, sugar and 1/4 cup of warm water (105°–115° Fahrenheit, (41°–46° Celsius) 
in a large bowl (or in the bowl of a stand mixer.) Let sit until foamy, about 5 minutes.

Add 1 tablespoon olive oil, the flour, the rosemary, the fine salt and 3/4 cup warm water; stir with a wooden spoon (or with the dough hook if using a mixer) until a dough forms. 

Turn the dough out onto a lightly floured surface and knead, dusting lightly with flour if necessary, until smooth and elastic, about 10 minutes. (Or knead with the dough hook on medium-high speed, adding a little flour if the dough sticks to the bowl, about 8 minutes.) I used a mixer with the dough hook and I needed to add a little more flour. If it feels too wet when done kneading, add more flour until it feels like dough and is not wet or sticky.

Brush a large bowl with olive oil. Add the dough, cover with plastic wrap and let stand at room temperature until more than doubled, about 2 hours.

Line 2 baking sheets with parchment paper or a silicone mat. Generously flour a work surface; turn the dough out onto the flour and divide into 4 pieces. Working with one piece at a time, sprinkle some flour on the dough, then fold the top and bottom portions into the middle. Fold in the sides to make a free-form square. Use a spatula to turn the dough over, then tuck the corners under to form a ball. Place seam-side down on a prepared baking sheet. Repeat with the remaining dough, putting 2 balls on each baking sheet. Let stand, uncovered, until more than doubled, about 2 hours.

Preheat the oven to 400 degrees Fahrenheit, 200 degrees Celsius, Gas Mark 6.

Bake the loaves 10 minutes; brush with the remaining 1 tablespoon olive oil and sprinkle with the kosher or coarse salt and the remaining 1/2 tablespoon rosemary. Continue baking until golden brown, about 10 more minutes. Transfer to a rack to cool.


I hope you love this recipe as much as I do!

Saturday, July 21, 2012

Cucumber Ribbon Salad and A Thousand Cranes Party


Every single one of us can do things that no one else can do -
Can love things that no one else can love...We are like violins,
We can be used for doorstops, or we can make music.

-Barbara Sher


This is a salad I've been making for years. I love it's simplicity. Now that it's summer, there's nothing more refreshing on a hot day than a cucumber. Today is the first day this summer that I've made the salad. It reminds me of a party I had for a few Japanese friends of mine who were getting married. This salad was one of the dishes served. We had a Thousand Cranes Party.


This dish is so easy, here are the dressing ingredients. All in all, less than 5! And takes about 5 minutes to make.

The story of a Thousand Origami Cranes is a Japanese legend that promises that anyone who folds a thousand origami cranes will be granted a wish by a crane, such as long life or recovery from illness or injury.

The crane in Japan is one of the mystical or holy creatures (others include the dragon and the tortoise), and is said to live for a thousand years.

It is traditional to take the thousand origami cranes and string them up, and hang them at your wedding. Or not just a wedding, one could hang them in your room, even. It's good luck. And it also signifies world peace. It's a prayer in paper form.


You need a mandoline slicer to get the cucumbers really thin.

I read stories of brides folding origami cranes months before their wedding, and mothers of brides helping fold them. Some are given to the bride as gifts.

I knew when I read about this tradition, I wanted my party for my friends to have a Thousand Cranes theme. First I needed some origami cranes to hang. I read about this about a week before the party, so first I consulted Etsy and Ebay to purchase some.


No luck. No one could get them to us fast enough. So my friend Cindy and I started folding origami cranes. How in the heck did we do that, you ask? We consulted U Tube of course! We found a great tutorial on how to make them. Still not super easy, and not the fastest thing to make for a couple of gringos who have never folded origami anything in their life.


Here's our cranes we made hanging in my dining room, with some paper lanterns and streamers.

All in all, we had hundreds of cranes, not a thousand. No matter, it's the thought that counts, right?


We made some bigger cranes to hold our place cards.


I was even able to find crane chopstick holders


The couple was so delighted. They took home our cranes to hang in their new baby's room. We were so relieved they liked them, and were proud the cranes we folded were worthy.


All in all it was such a great and fun party! I love learning traditions from other cultures. 


In the hot weather I like to make cucumber water. Just add sliced cucumbers to ice water and let sit a half hour or so for the flavors to blend. When I drink it I feel as if I'm at the spa waiting for a facial.

Personal Size Princess House Water Pitcher available at my Etsy Shop, House of Lucien.


Never miss a post! Like The Alchemist on Facebook!


Cucumber Ribbon Salad

Make this salad right before eating, if let sit too long it will get soggy.

Recipe Adapted from  Epicurious

Ingredients

1/4 cup (59 ml) seasoned rice vinegar

1-2 teaspoon sugar

1 teaspoon soy sauce

1/2 -1 teaspoon Asian sesame oil

 2 English cucumbers (1 1/4 lb total)

Sesame Seeds (optional)


Directions

Add all dressing ingredients  (everything except the cucumbers and sesame seeds) in a medium bowl and whisk till blended. Set aside. Slice the cucumbers thin on a mandoline slicer (or another type of slicer, I used this one from Kuhn Rikon, it works well and I bought it at Marshals for maybe 10 bucks, I also have a fancier one, but if you don't own one I think it's work it.) into  1/8 inch thick ribbons. Toss Cucumbers with dressing and top with sesame seeds (if using) and eat immediately.

* edited to add* If you don't have a mandoline, or if you want the salad to last longer and not get soggy, I've been told that just slicing the cucumbers (so they're not so thin) into 1/2 inch slices, will prevent them from getting soggy so fast. If you do that, I'd let the salad sit 30 minutes or so to absorb the flavors.

If you let the dressing sit too long it will get soggy, (longer than about 20 minutes.)

Thursday, June 28, 2012

Asian Noodle Salad


"Without leaps of imagination, or dreaming, we lose the excitement of possibilities. Dreaming, after all, is a form of planning."

-Gloria Steinem
Writer and Journalist


This salad is one of my favorites. I've made it for parties, I've made it for potlucks, and it's always well loved. It's fresh and full of vegetables, and full of flavor. I think it's a perfect salad for a summer picnic!


Some of the ingredients of my salad, peppers, cilantro, cabbage, bean sprouts, spinach and cashews

One of the great things about this salad is that you can mix and match different vegetables based on your taste. You can also fill it with vegetables, of just have a little. It's all up to you and based on your taste.


Don't like bell peppers? Leave them out! Allergic to nuts? Cool! Leave the cashews out. This salad will still be tasty.


The dressing is so delicious, with fresh ginger and garlic, I love it. Sometimes I double it to use in salads later. It's just that good.


I use whole wheat linguine as the noodle element, but you can use udon noodles instead to keep it actually Asian. Or use brown rice pasta, and Tamari Sauce instead of soy sauce to make it gluten free.


Asian Noodle Salad

Remember, you can add different vegetables for this, and as many as you want. Some variations not included below are: julienned carrots, cucumbers, thinly chopped celery, or even sliced zucchini or yellow squash. Use whatever vegetables sound good to you.
Loosely based on one from The Pioneer Woman

Ingredients

For the Salad-

1 package (16 oz.) Whole Wheat Linguine Noodles, or Brown Rice Spaghetti, Cooked, Rinsed, And Cooled

1 head thinly sliced Purple Cabbage or Napa Cabbage- I use a Mandoline to get it nice and thin

1 bag (8 oz.) Baby Spinach, sliced

About 2 Red or Yellow Bell Peppers- I used a small bag of different colored peppers

1 bag Bean Sprouts -also Called Mung Bean Sprouts

3 Carrots, shredded
 
Chopped Cilantro, Up To 1 Bunch, To Taste

3 whole Scallions, Sliced

10 oz. (283 mg.) Unsalted Whole Cashews, Lightly Toasted In Skillet


 For the Dressing

1/3 cup (79 ml) Rice Vinegar - unseasoned, but if seasoned (means  it has sugar) then reduce the sugar below by half)

1/3 cup (54 mg) Brown Sugar

1/3 cup (79 ml.) Olive Oil

8 Tablespoons Soy Sauce or Tamari Sauce

2 Tablespoons (up To 3 Tablespoons) Sesame Oil

3 Tablespoons Fresh Ginger, Finely Chopped

2 cloves Garlic, Finely Chopped

Directions

Toss the noodles with most of the vegetables. For example sometimes I don't use the whole head of cabbage, or the whole amount of spinach. So I toss everything with about half of the cabbage and spinach then I see if I like the ratio of vegetables to noodles. If I don't I add more cabbage and spinach till I get it where I like the way it looks. You do the same.

Whisk dressing ingredients together and pour some over salad. Toss the salad with the dressing and see if you like the amount of dressing on the salad. If you need more add it till you get enough dressing on the salad for your taste. Refrigerate until serving.

Friday, September 23, 2011

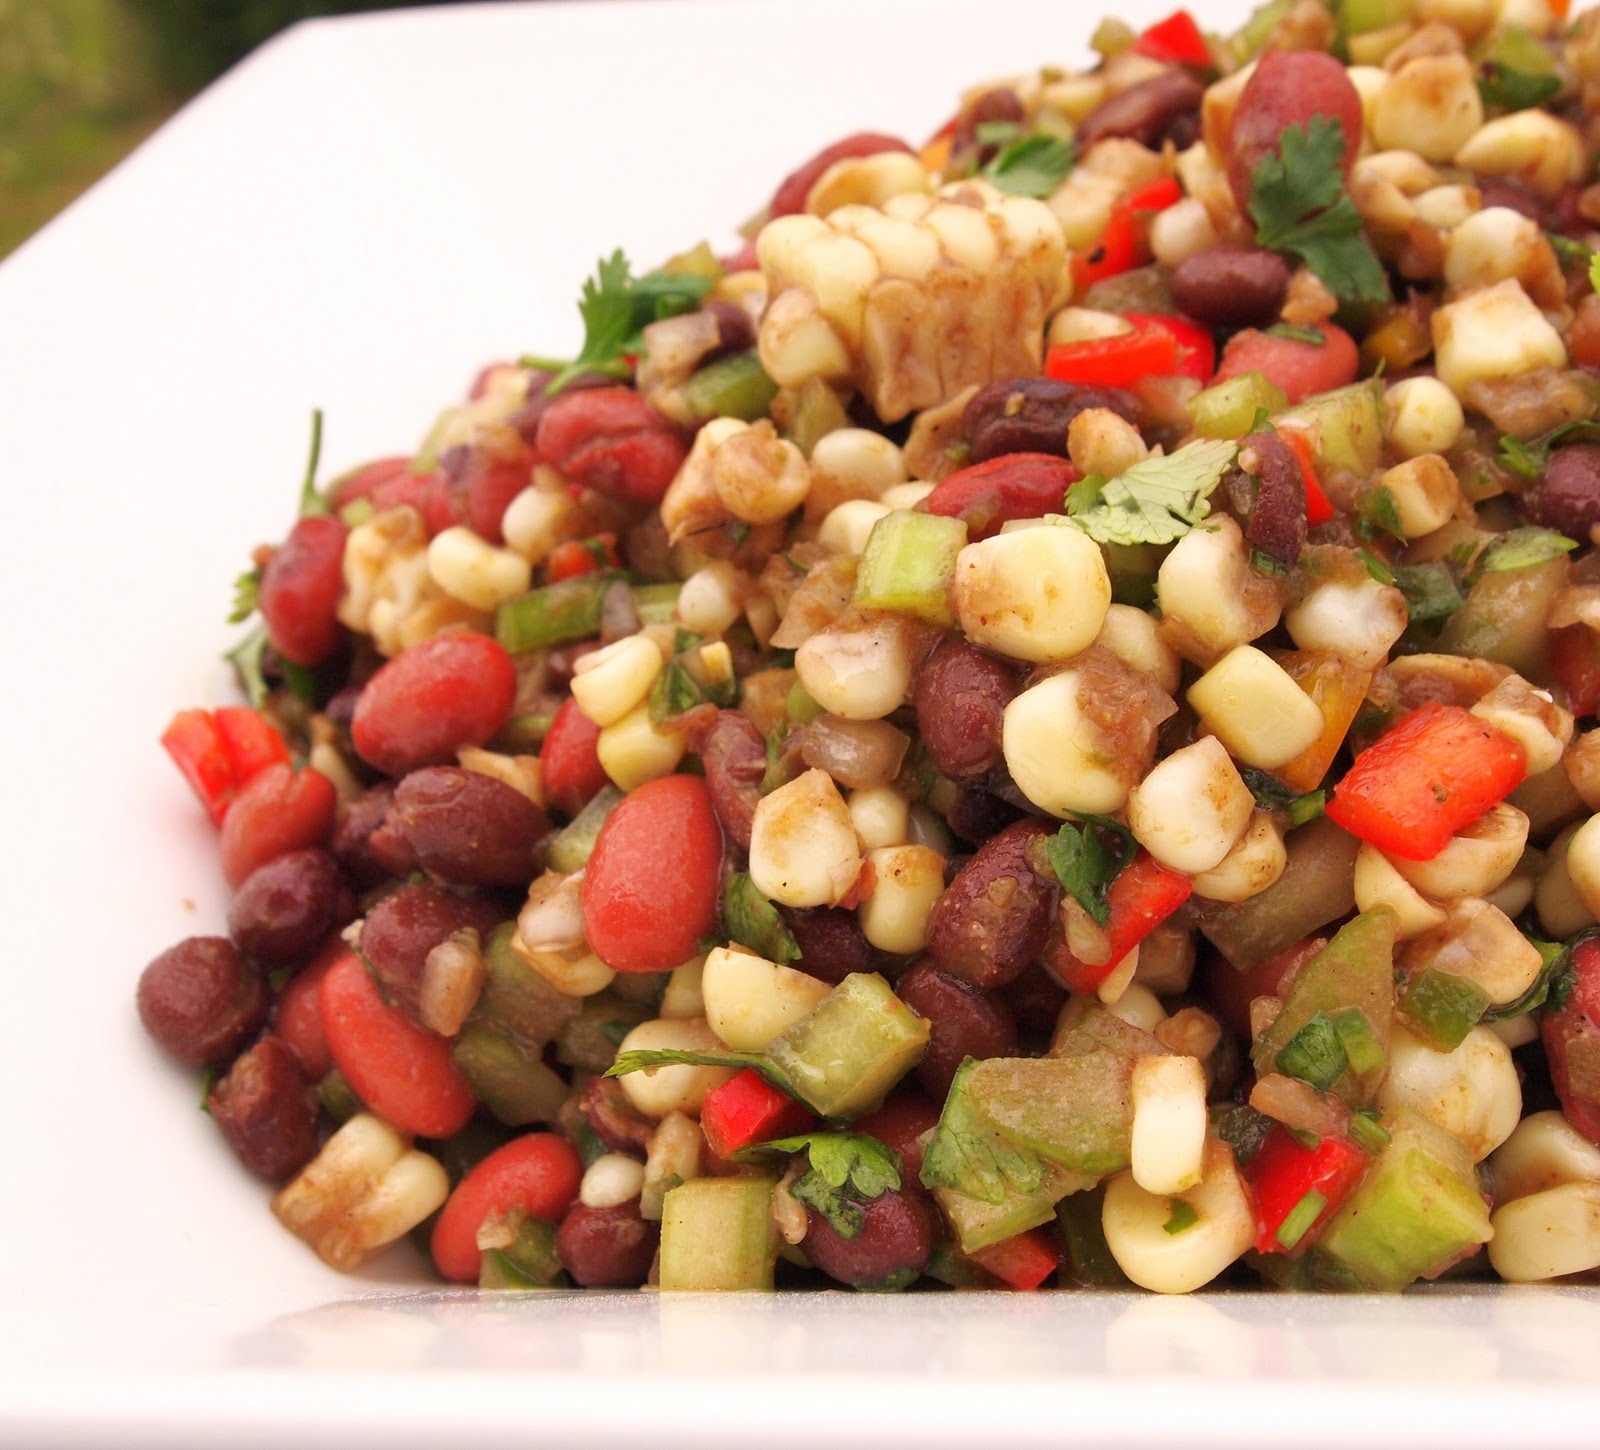
Fresh Corn and Bean Salad


"Sex is good, but not as good as fresh, sweet corn."

 ~Garrison Keillor


Happy harvest season! Our corn is ready for picking, and we sure have been enjoying it. Just yesterday with dinner I served my husband an ear of corn I had picked within minutes of cooking. He pronounced it was the best corn he had ever eaten. Juicy and sweet, it is the delicious reward after months of growing.


I have made this salad multiple times this summer. The first time I made it, afterwards I thought, this salad sure makes a lot, I don't know if we'll eat it all (since it's just the two of us.) I was thinking I may have to feed it to the chickens in a few days. Boy was I wrong. The both of us ate it all, in just a few days and enjoyed every bite.


This salad is incredibly fresh tasting and full of veggies. The perfect accompaniment for a burger, or a piece of fish or whatever protein your heart desires. Or heck, just eat it alone. It's full of beans, so it's filling, healthy and vegan too!


The fresh corn flavor is so amazing in this salad. Everyone has their favorite way of cooking corn. Lately mine has been baking it in the oven. The corn flavor stays intact inside their husks and it's super easy (The details are below in the recipe). Thanks Michelle for the tip!

If you don't want to turn on the oven you can always cook it on the stove. In my Dean and Deluca cookbook, they recommend cooking corn in their husks in boiling water. Once the water boils, place unhusked corn in, start timing once it starts boiling again and cook for about 5 minutes. The advantage to cooking corn in the husks is that the silks are easier to remove after cooking. (Wait for it to cool a bit first before removing husks.)


Fresh Corn and Bean Salad

Inspired by this recipe

Ingredients

1/3 cup olive oil

2 tablespoons balsamic vinegar

3 teaspoons ground cumin

4 ears of fresh corn, or about 2 1/2 cups frozen corn

1 -15 1/2-ounce can red kidney beans, rinsed and drained

1- 15 1/2-ounce can black beans, rinsed and drained

3 celery stalks, chopped

1 medium-size red, yellow or orange bell pepper, chopped

1/2 cup (70 g.) chopped white onion

1/2 cup (35 g.) chopped fresh cilantro

1-2 jalapeño chilies, seeded and chopped -optional, depending on the spice level you desire

Directions

If using fresh corn, bake it (husks intact) in a preheated 400 degree Fahrenheit, 200 degrees Celsius, or Gas Mark 6, oven for about 45  minutes. Remove from oven and cool.

Meanwhile, whisk oil, vinegar, and cumin in large bowl to blend. When corn has cooled, cut it off the ears with a knife and add it along with the remaining ingredients to the bowl. Toss it all to coat and season with salt and pepper.

Let stand before eating if possible. An hour, or a few is good so the flavors can meld. Even overnight makes for a nicely flavored salad.

Serves about 8 as a side dish.

Saturday, June 4, 2011

Mexican Horchata


"If a June night could talk, it would probably boast it invented romance."

- Bern Williams


The weather right now in Western Washington is just perfect. Sunny with a slight breeze. Heaven. In the warm weather you need more refreshing, delicious things to drink, in my opinion. I enjoyed my watermelon cocktail last weekend so much, I wanted to make something else special to drink.


Since my watermelon cocktail was similar to an agua fresca with some booze added, I had Mexico on my mind. So here's another hispanic drink. Mexican Horchata is a creamy, sweet, rice drink flavored with cinnamon.


Wiki tells me  it's made different ways in different countries. Sesame seeds in Puerto Rico, for instance. In El Salvador it's made with Morro seeds, not rice.


Another interesting tidbit from Wiki is, some Hispanic bars in Southern California use horchata as a mixer in a cocktail known as a "Rice Rocket." The drink is made of two parts horchata, one part coconut-flavored rum, and a dash of Goldschläger over ice. I grew up in Southern Cal, went to plenty of bars, and I never knew that. Sounds delicious. You learn something new everyday.


Seattle from the freeway
For today's totally off topic photo, is a picture of Seattle I took from the freeway, while driving (bad, I know) home from seeing the documentary I AM. Such a great movie. That was the second time I had seen it. If it's playing in your area, and it speaks to you, go see it. You won't be disappointed.
(Just don't go alone and take pictures through your car window while driving.)


Mexican Horchata

this makes about 4 tall glasses

Ingredients

1 cup (185 g.) uncooked white rice

3 sticks cinnamon (mine were about 4 inches long) (make sure they are fresh) plus longer ones for garnishing, if desired

8 1/2 cups (2 liters) water

1/2 to 1 cup (100 g.to 200 g.) sugar (depending on how sweet you want it)

2 tsp vanilla

Instructions

Rinse the rice under a fine mesh strainer. Place the rice, cinnamon sticks, and 2 cups (473 ml) of the water into a large bowl or large measuring cup with a spout (4 cup size or more) and cover.

Place in fridge and let sit for at least 2 hours or overnight.

Remove the cinnamon sticks and pour the rice/water mixture into a blender. (I used a Vitamix.) Blend well, for 3-5 minutes or so.

Strain it into a pitcher. Then put the rice/water mixture back into the blender container and add the remaining 6 1/2 cups of water. Add the vanilla then add the sugar. If you don't like things too sweet, add 1/2 cup (100 g.) of the sugar first,  then taste it and see if you want more. If you want it sweeter, add the remaining sugar and blend well again.

Chill, stir, and serve. Over ice is nice too.

Garnish with a cinnamon stick if you want.

Sunday, May 29, 2011

Fresh Watermelon Cocktail/Agua Fresca


"Death leaves a heartache no one can heal, love leaves a memory no one can steal."

 ~From a headstone in Ireland


Happy Memorial Day weekend! I'm still not feeling great from my car accident, but I did have enough energy to make this delicious drink. Watermelon just screams summer, doesn't it?


I wish it felt like summer here in Western Washington, not yet.  But just eating and drinking watermelon gives me hope that the sun will be coming out soon!


This drink is so refreshing. I think I'm going to make it all summer using whatever liquor I want. Today I used rum, later I will use tequila or vodka, or maybe even something like Midori. The possibilities are endless.


I came home the other day to find a chicken sitting waiting for me at the front door I think she missed me.


Watermelon Cocktail

Lately I've been making this without alcohol, without it, it's more of an agua fresca. Also, add whatever sweetner you like, lately I've been using honey.

makes 4 drinks


Ingredients

4 cups (1 liter) seedless watermelon, cubed

4 ounces (118 ml.) (4 shots) rum, or you can use vodka or tequila or any liquor that suits your fancy - optional

1/4 cup (84 ml.) lime juice

1/4 cup (50 g.) - 1/2 cup (100 g.) sugar - depending on your taste - or use whatever sweetner you like, I've been using honey lately

2 cups (500 ml)  ice cubes

4 lime slices (optional)

Directions

Place everything besides the lime slices in the blender and let 'er rip. It's best to put the watermelon and lime juice first, then sweetner, then ice.

Strain it to remove the small bits of seeds, then pour into glasses and garnish with a lime slice if you wish.